If you have just installed your Zip Hydroboil system by a qualified plumber (or if you are the plumber) and it is not working, please check all the following questions. These questions need to be clarified before a warranty claim can be logged.:
- Was the Zip Hydroboil installed by a qualified electrician?
- Has the unit been installed correctly as per the installation guide
- Is there water supplied to the unit on
- Was water running from the tap before turning power on to the Zip Hydroboil
- Was the water supply pipe flushed before connecting to the unit.
- Has the in line shut off valve that was supplied with the unit been installed (Note it has to be our shut off valve that we supply as it has an in line strainer)
- Does the Zip Hydroboil have the required space around the unit as per the installation guide. (Ventilation is required for the unit )
- Has there been a water interruption? It could be possible that the unit just tripped the overload switch due to a water interruption.
- Has the water supply been connected to the inlet and not to the vent.

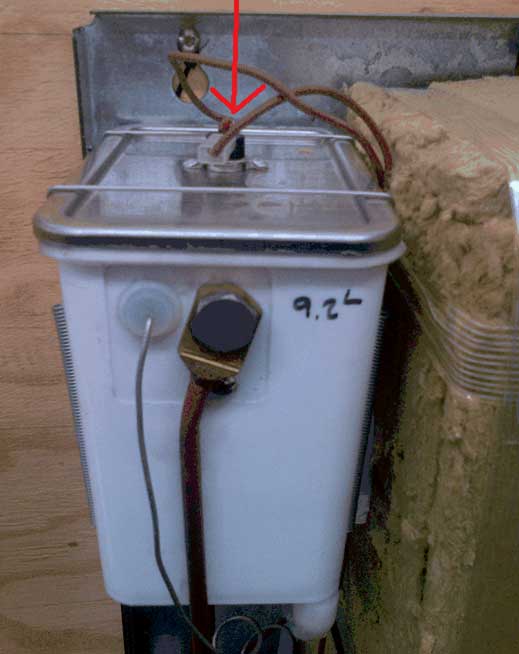
If it is possible that the unit just tripped the overload switch due to a water interruption, the unit just has to be reset. The picture below shows the reset switch.


Quick ZIP Hydroboil Installation tips
PLEASE NOTE ALL ZIP HYDROBOILS ARE TESTED BEFORE LEAVING THE FACTORY TO ENSURE THAT THEY REACH YOU IN PERFECT WORKING CONDITION.
Following the simple, but critical, installation steps to ensure the warranty does not expire.
STEP 1: PRE-INSTALLATION
- FLUSH THE PIPES BEFORE COUPLING THE HYDROBOIL TO WATER SUPPLY.
- DO NOT CONNECT TO ELECTRICITY SUPPLY FIRST- CONNECT THE UNIT TO THE WATER SUPPLY AND KEEP THE WATER SUPPLY ON.
- THE BOILER MUST BE FULL OF WATER BEFORE IT IS SWITCHED ON
- IF NOT, THE ELEMENT WILL BE DAMAGED AND THE WARRANTY WILL NOT BE VALID.
STEP 2: INSTALLATION
- Position the unit on the wall and mark the key holes.
- NB: 150 MM CLEARANCE ONT HE TOP OF THE UNIT AND 300 MM TO THE LEFT OF THE UNIT IS REQUIRED FOR SERVICING.
- Drill suitable holes in the wall and insert wall plugs.
- Mount the unit on the wall with screws and washers.
- Replace the reset clamp.
- Connect the water supply to the cold water inlet and connect the overflow pipe.
- Turn the water on and check for leaks.
STEP 3: FINISHING
- Replace the cover.
- Tighten all cover screws.
- Open the tap until water passes through and the unit is filled with water.
- Only then turn the power on.
- Boil the water then drain all of the hot water to remove impurities in the unit.


6 Comments
Good Morning
May you kindly provide me with safety guide to use Zip Hydro-boil, i am just keen to understand the safe use of this equipment so that i can make other people aware.
There are no HASLAC safety guides using a wall mounted water boiler. In essence it is the same as using a kettle. The person responsible for Health & Safety must compile a document for your users in their specific environment.
Hi,Would you please spare me with routine maintenance guide on the ZIP HYDROBOL
Hi Cassius. I have sent you a guide to servicing the Zip Hydroboils. Servicing intervals is influenced by the quality of your water and how many times it is used per day. The most common part that is replaced is the elements due to scale build-up.
Hi
My boiler doesn’t fill up
The float stops before it’s filled up in the boiler
Hi, you need to contact the certified plumber that did the installation.